Posts

How to edit, change or setup a library

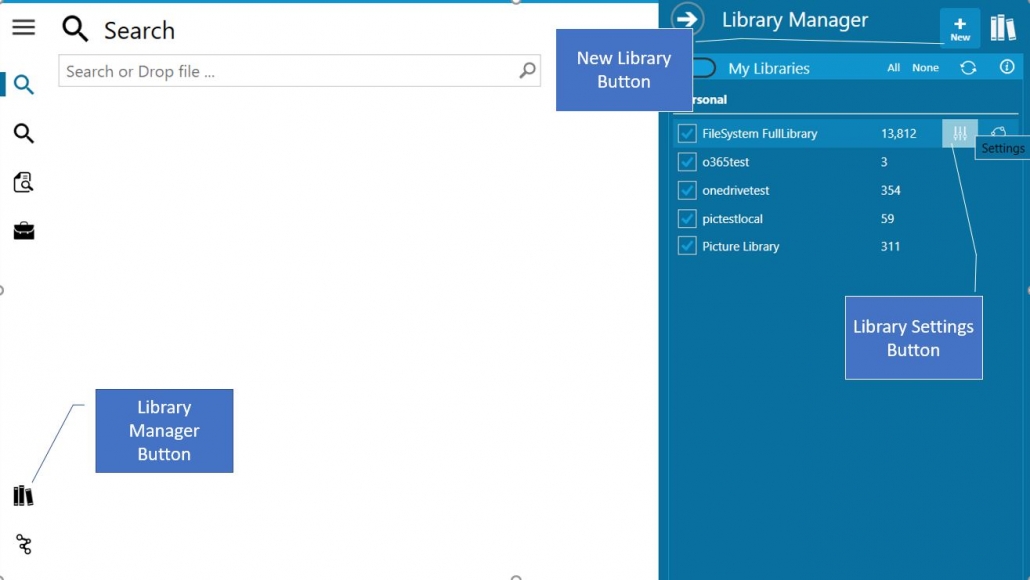
To change the properties of a library, please open the library manager and move your mouse over the library you want to edit. A new menu icon “settings” will appear at the right side of the library in the manager panel. A new window will open to allow to change the current library settings and parameters. To setup a new library, please use the “+” button at the top of the library manager panel:


How To Create A New Digital Library

Option A: You can use the Library Wizard to connect additional storage locations with “one-click” setup.

Click on the “Link Drives” icon in the menu panel and activate additional storage locations with the on/off button for each location.

add storage locations

Option B: Setup individual libraries with individual folder selection, different file type specification, and parameter configuration with the Library Manager.

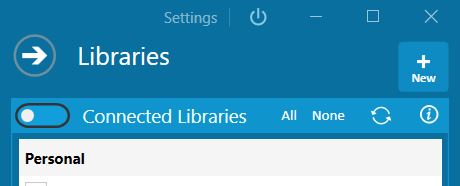
Open the “Library Manager” from the menu panel. The “NEW” library button in upper right corner of the “Libraries” panel opens a new dialog to build an individual document library.


New Library Button

New Library Button


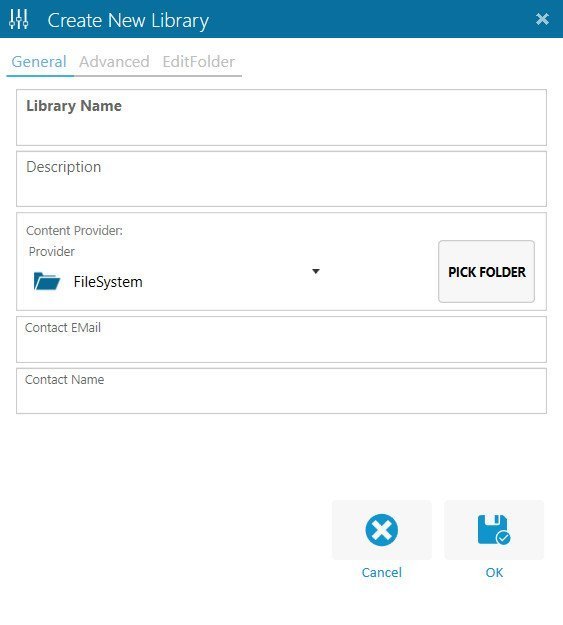
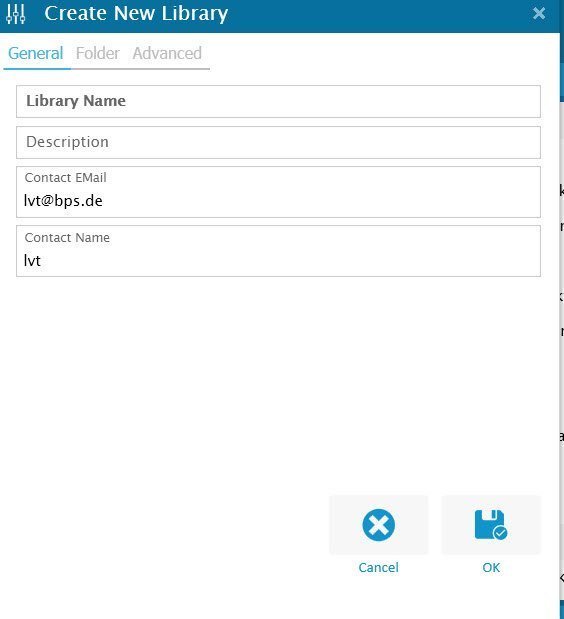
A new window opens to set all parameters for the new library.

Create Library

Create New Library Screen


Now, just add the requested information to setup the library:

  1. Add a name to your library
    The name is shown in the library panel.
  2. Give it a short description
    The description is a short information about the content for the library.
  3. Select the provider you want to use
    You can choose between your local file system, network drives and cloud providers like OneDrive, OneDrive Business, Dropbox, Dropbox Business, Office365 Sharepoint Online or Google drive.
  4. Select the folders for indexing via the pick folder button
    Now, the pick folder screen allows to select the folders which should be included for the library. Finally, press “OK” once you have selected all folders. In addition, you can add/update and change the folder selection later at anytime.

    Select Folder Dialog

    Select Folder Screen

  5. Add or change the contact EMail
    Furthermore, if you decide to share your library with other colleagues later, the email information is important for your collabortors. Therefore, if a collabortor finds a documents within your library, the email can be used to request access to that document.
  6. Add or change your short name
  7. Click “OK”
    Finally, a dialog will open to allow direct indexing start.

Document Library – How to search and find documents

How to create a document library for searching documents


Network Team Libraries

Network Team Libraries are libraries which are stored in a central network folder. This allows users to directly connect to the library without downloading local libraries. The downside is that libraries from network devices slow down the indexing and searching process. So it is not recommended to use team network libraries.

If you create a team network library via the advanced settings panel during library creation, you must make sure that the selected network path for the library file is available for all people with whom you want share this library later. Otherwise the colleagues will not be able to connect to this library.

A valid UNC network path looks like: \\server\share

Initial Client Setup / How to Setup a Library

Initial Setup And How to Create a Library

1. START BUILDING YOUR FIRST LIBRARY

You can start building your first library by using the “manage” button.

LibMger

In the library panel on the right screen, press the “create new” [+] button and provide name and folders for indexing. After saving the first library settings, you can start the indexing process.

createnewlib

Thats it; you have created your first library. The indexing process will run in the background.

2. ACTIVATE YOUR MANAGED ACCOUNT WITH THE NOGGLE NETWORK

In order to share and receive libraries, pleace activate a license via our noggle.online portal. You can start with a BASIC license for free which comes with basic account registration. After selecting your license type (Basic or Pro) you will receive a activation eMai with an authorization code. If your domain is part of an ENTERPRISE license type, you do not need to buy a seperate license. Just register your noggle account for free – your corporate enterprise license for your Noggle Client will be set automatically! Just wait for a confirmation eMail with your authorization code in your inbox.

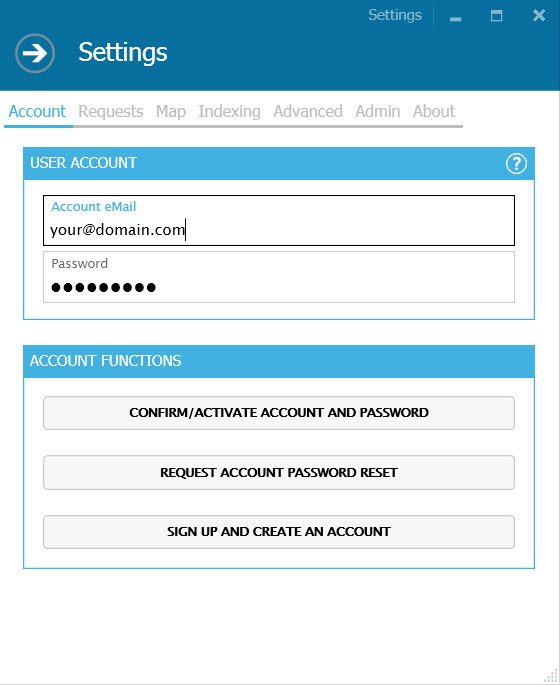
You need to navigtate to the configuration screen via the Settings button in the application title bar. Please put in your eMail address, set your password, confirm it and insert the authorization code from the eMail.

account

By pressing the “Set account Password” button – the client checks for a vaild license and authorizes your application for our managed services. This is only needed once for initial activation.

3. START SHARING AND RECEIVING LIBRARIES

You are now ready to share an receive libraries via the “share” button if you navigate over the library entries in the library panel after indexing has finished.


What is a noggle library?

What is a noggle library?

The Noggle library functions are based on Lucene, an open source, highly scalable text search-engine library available from the Apache Software Foundation. Web sites like Wikipedia and LinkedIn have been powered by Lucene.

Noggle brings the best availabe search and indexing technology right to your desktop, the Noggle App.

Based on Lucene in the back, Noggle is able to achieve fast search responses because, instead of searching the text directly, it searches an index instead – the “noggle library”. This would be the equivalent of retrieving pages in a book related to a keyword by searching the index at the back of a book, as opposed to searching the words in each page of the book.

Noggle library tools focus mainly on text indexing and searching. It is the core element that is used to build different search capabilities. Based on Lucene, the noggle library core has many features. It:

  • Has powerful, accurate, and efficient search algorithms.
  • Calculates a score for each document that matches a given query and returns the most relevant documents ranked by the scores.
  • Supports many powerful query types, such as PhraseQuery, WildcardQuery, RangeQuery, FuzzyQuery, BooleanQuery, and more.
  • Supports parsing of human-entered rich query expressions.
  • Allows users to extend the searching behavior using custom sorting, boosting and extending search ideas.
  • Uses a file-based locking mechanism to prevent concurrent index modifications.
  • Allows searching and indexing simultaneously.

The Noggle library core lets you index any data available in textual format. Therefore, Noggle uses pre-processing and parsing techniques to extract the plain text from different source formats like Word, PowerPoint, Excel, PDF files and other formats. Noggle can be used with almost any data source as long as textual information can be extracted from it. The first step of noggle before building the library by indexing the data is to make it available in simple text format. Noggle uses custom parsers and data converters; mainly based on the Microsoft IFilter technology.

Indexing is a process of converting text data into a format that facilitates rapid searching. A simple analogy is an index you would find at the end of a book: That index points you to the location of topics that appear in the book.

Noggle stores the input data in a data structure called an inverted index, which is stored on the file system or memory as a set of index files. Most Web search engines use an inverted index. It lets users perform fast keyword look-ups and finds the documents that match a given query. Before the text data is added to the index, it is processed by an custom noggle analyzer.

The analyzer is converting the text data into a fundamental unit of searching, which is called as term. During analysis, the text data goes through multiple operations: extracting the words, removing common words, ignoring punctuation, reducing words to root form, changing words to lowercase, etc. Analysis happens just before indexing and query parsing. Analysis converts text data into tokens, and these tokens are added as terms in the Noggle library index.

As a result, a high-performant library is created which can be shared with your peers to execute search request in milliseconds over the full content. The indexing and library building process is not only providing fast search results – it also provides relevant ranking scores back to the search results.

Once your decide to share a noggle library with one of your peers, the library will be encrypted and obfuscated once it leaves your client to the noggle network. Only the named peer is available to decrypt the library – so your library is always secure in the noggle network.