Noggle is able to index and find your ebooks. All epub ebook files will be analyzed and put into the internal search index. It allows you to execute a full text search in your ebooks from the Noggle search application.
https://www.noggle.online/wp-content/uploads/2019/05/epubSearch_example.jpg10281647LvThttps://www.noggle.online/wp-content/uploads/2015/12/noggle_l4_trans_black_goo.pngLvT2019-05-17 21:19:402019-05-17 21:22:20epub ebook search: How to find ebooks and related documents
In order for Noggle to work with Office365 connectors like OneDrive or Teams, it needs to get consent to read the profile and files for the MS Graph API of the signed-in user. Some people fall in the middle where they are happy to consent as long as they can choose to revoke that consent after they are done playing with the app.
It is not very obvious what you need to do to revoke consent for an Azure Active Directory Application. Even people on the Identity team don’t always know. So let’s talk about how you can do it
Using the My Apps Portal for Individual User Consent
You can revoke individual user consent through the My Apps Portal. Here you should see a view of all applications that you or even your administrator (on your behalf) has consented to:
With applications your admin has consented to, all you can do is open the app, however for apps where you individually consented as a user, you can click “Remove” which will revoke consent for the application.
Using the Azure Portal to Remove Tenant Wide Consent
If you are a tenant administrator, and you want to revoke consent for
an application across your entire tenant, you can go to the Azure Portal.
Whether it be for a bunch of users who individually consented or for an
admin who consented on behalf of all the users, by simply deleting the
application’s service principal, you will remove all OAuth 2 Permission Grants (the
object used to store consent) linked to that application. Think about
removing the service principal like uninstalling the application from
your tenant.
You could delete the service principal a bunch of different ways like through Azure Active Directory PowerShell or through the Microsoft Graph API, but the easiest way for the average administrator is right through the Azure Portal.
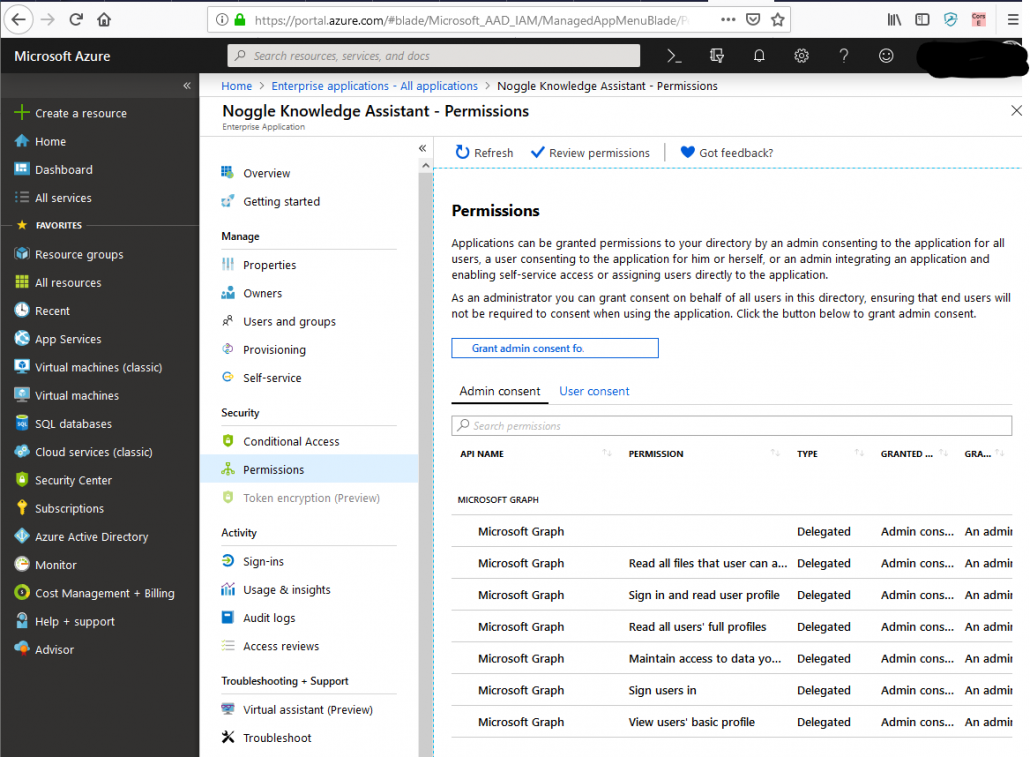
Navigate to the Enterprise Applications blade in the Azure portal:
When you click the Noggle application, you will be brought to an “Overview” section, where a tempting button called “Delete” will be at the top. Before you click this button, you might want to take a peak at the “Permissions” section to see the types of consent that was granted to this application:
Once you feel confident that you want to delete this application, go back to “Overview” and click “Delete”.
The consent associated with the Noggle Knowledge app is now gone for your organization.
https://www.noggle.online/wp-content/uploads/2015/12/noggle_l4_trans_black_goo.png00LvThttps://www.noggle.online/wp-content/uploads/2015/12/noggle_l4_trans_black_goo.pngLvT2019-05-06 08:19:202019-05-06 08:24:20Revoking Consent for Noggle Knowledge App in Azure Active Directory
You can now create libraries of different OneDrive business accounts for the same provider (e.g. Microsoft OneDrive, Teams). A possible usage scenario is, for example, if you have several OneDrive Business Accounts and would like to integrate them into Noggle to ensure a uniform OneDrive Business search. Or if you work in several Microsoft teams with different accounts.
Here is how to connect with different accounts:
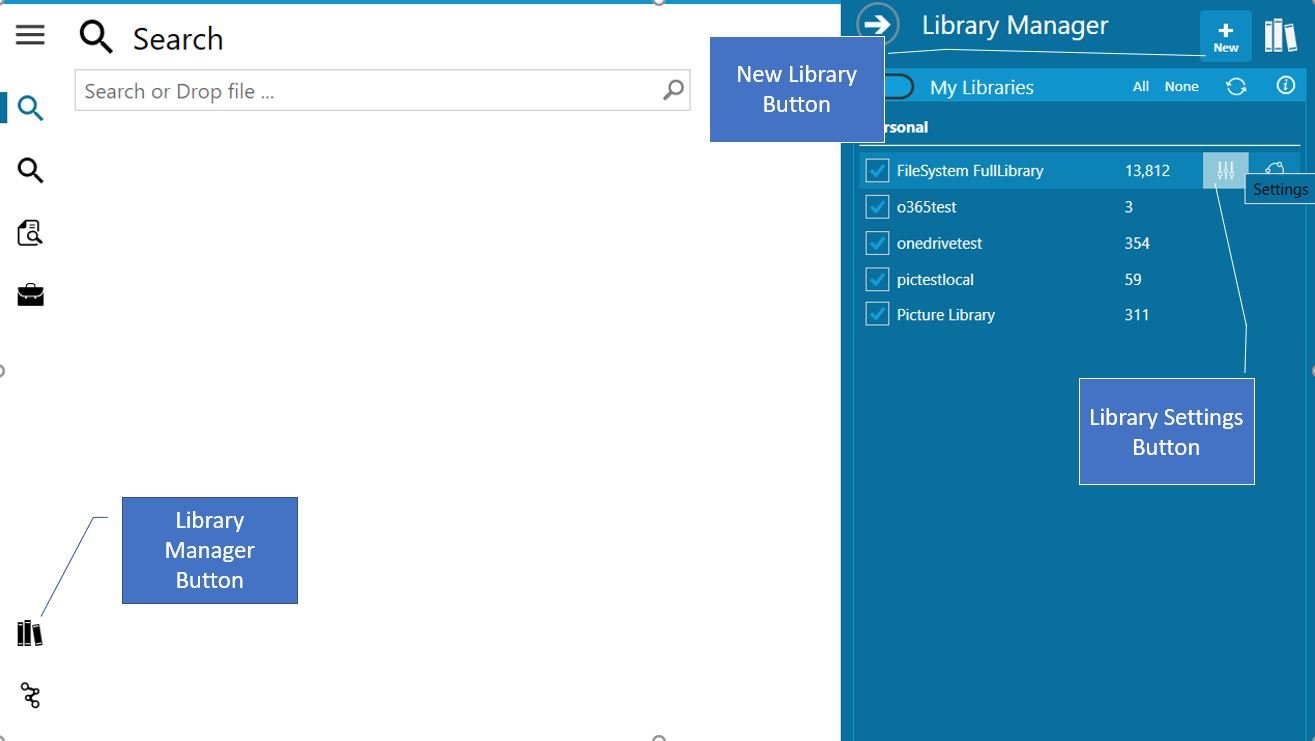
1. Open the Libray Manager panel
2. Create a new library via + button in the library manager panel
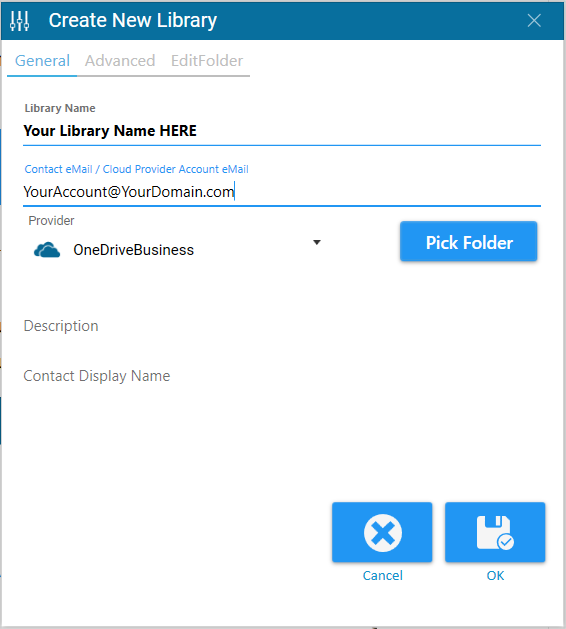
3. Name the library, add your account email and select provide
Please add your individual name. You can name choose your account eMail your want to link this connector to. Select the required connector in the “Provider” dropdown:
4. Click “Pick Folder” to start connecting to your account
If you click the pick folder button, Noggle will try to connect to the selected provider. The individual authorization dialog will start. The connection and authentication will be saved and synced with the given eMail from step 3. The authorization will be saved and kept once you did the authorization flow with you provider.
Once you finished the authentication flow, the folder selection panel will open. Please select one or more folders that should be indexed to ensure OneDrive business search in this library.
https://www.noggle.online/wp-content/uploads/2019/04/grafik-3.png629566LvThttps://www.noggle.online/wp-content/uploads/2015/12/noggle_l4_trans_black_goo.pngLvT2019-04-27 19:19:202019-04-27 19:19:23OneDrive Business Search: How to connect different accounts
Often, content, documents and knowledge is stored or archived in your eMail inbox including attachments. PST and OST are the Outlook data files acting as database to organize your eMail content. Individual PST or OST files hold your history of eMails and attachment. A search in outlook pst data files could be a great benefit to quickly browse your mail archives.
The good point is, that Noggle can completly index and integrate your PST outlook files into the Noggle search application. Noggle indexes eMail content including a full text and/or OCR scan of all attachments. This allows you to retrieve all emails and documents right from your Noggle search application.
Just add a new library with the PST source selection.
Open the library manager rom the left main menu panel.
Select the “+” button to create a new library on the right library manager panel.
Name your new library, e.g. eMail Archive
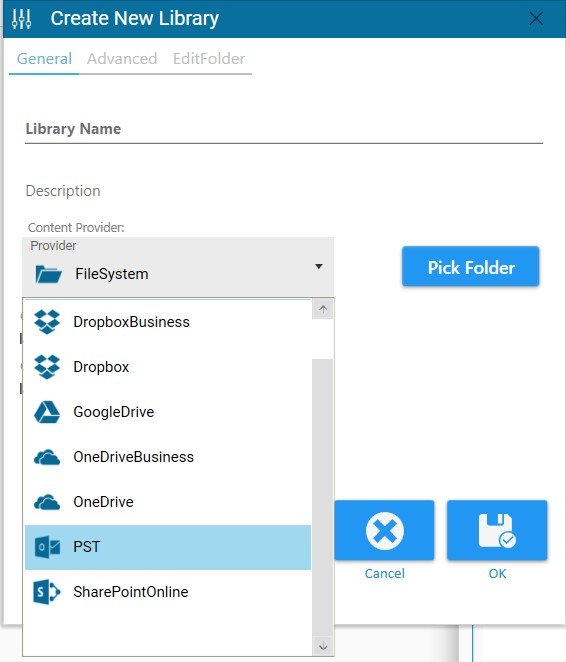
Select PST as content provider from the dropdown (see image below)
Choose your .pst or .ost file from the file picker dialog
Click “Pick Folder” to select the mailbox folder to get indexed
Click “OK” to start the indexing routine
Create a new library with PST as content provider
You can also diretly open found eMails or attachments from within the Noggle client. No need to import your PST file into Outlook – simply use Noggle to search and retrieve important knowledge out of your existing PST files.
https://www.noggle.online/wp-content/uploads/2015/12/noggle_l4_trans_black_goo.png00LvThttps://www.noggle.online/wp-content/uploads/2015/12/noggle_l4_trans_black_goo.pngLvT2019-03-22 19:50:442019-03-22 19:52:23Search Outlook pst data files to find messages and attachments
To change the properties of a library, please open the library manager and move your mouse over the library you want to edit. A new menu icon “settings” will appear at the right side of the library in the manager panel. A new window will open to allow to change the current library settings and parameters. To setup a new library, please use the “+” button at the top of the library manager panel:
https://www.noggle.online/wp-content/uploads/2015/12/noggle_l4_trans_black_goo.png00LvThttps://www.noggle.online/wp-content/uploads/2015/12/noggle_l4_trans_black_goo.pngLvT2018-06-01 17:48:012018-06-01 17:48:01How to edit, change or setup a library
You can use the Noggle PRO application on as many computer as you like with just one single PRO license. As long as you use the same user account name on each computer.
Once you registered your PRO license from the first computer, you will receive an email with your individual, personal application key. You can re-use this application key to enable your PRO license on other devices too.
Just download and install the free basic Noggle Windows 10 application via the Microsoft store on each computer. Finally, add your user account email and application key in the settings panel. Now, you can use your PRO license on all devices.
https://www.noggle.online/wp-content/uploads/2015/12/noggle_l4_trans_black_goo.png00LvThttps://www.noggle.online/wp-content/uploads/2015/12/noggle_l4_trans_black_goo.pngLvT2018-03-31 11:51:452018-03-31 11:53:12One license for desktop, laptop, tablet, and work computer
You can upgrade your Noggle application to a full version via the “In-App” purchase option. Start the application on your local desktop and open the “Settings” section via the button in the lower left corner of the application. In the “Account” tab, use the available button to upgrade/buy a license.
You will be directed to the Microsoft Store In-App purchase dialog to complete your purchase.
https://www.noggle.online/wp-content/uploads/2015/12/noggle_l4_trans_black_goo.png00LvThttps://www.noggle.online/wp-content/uploads/2015/12/noggle_l4_trans_black_goo.pngLvT2018-02-10 20:03:522018-04-14 21:03:34How to order or upgrade your account
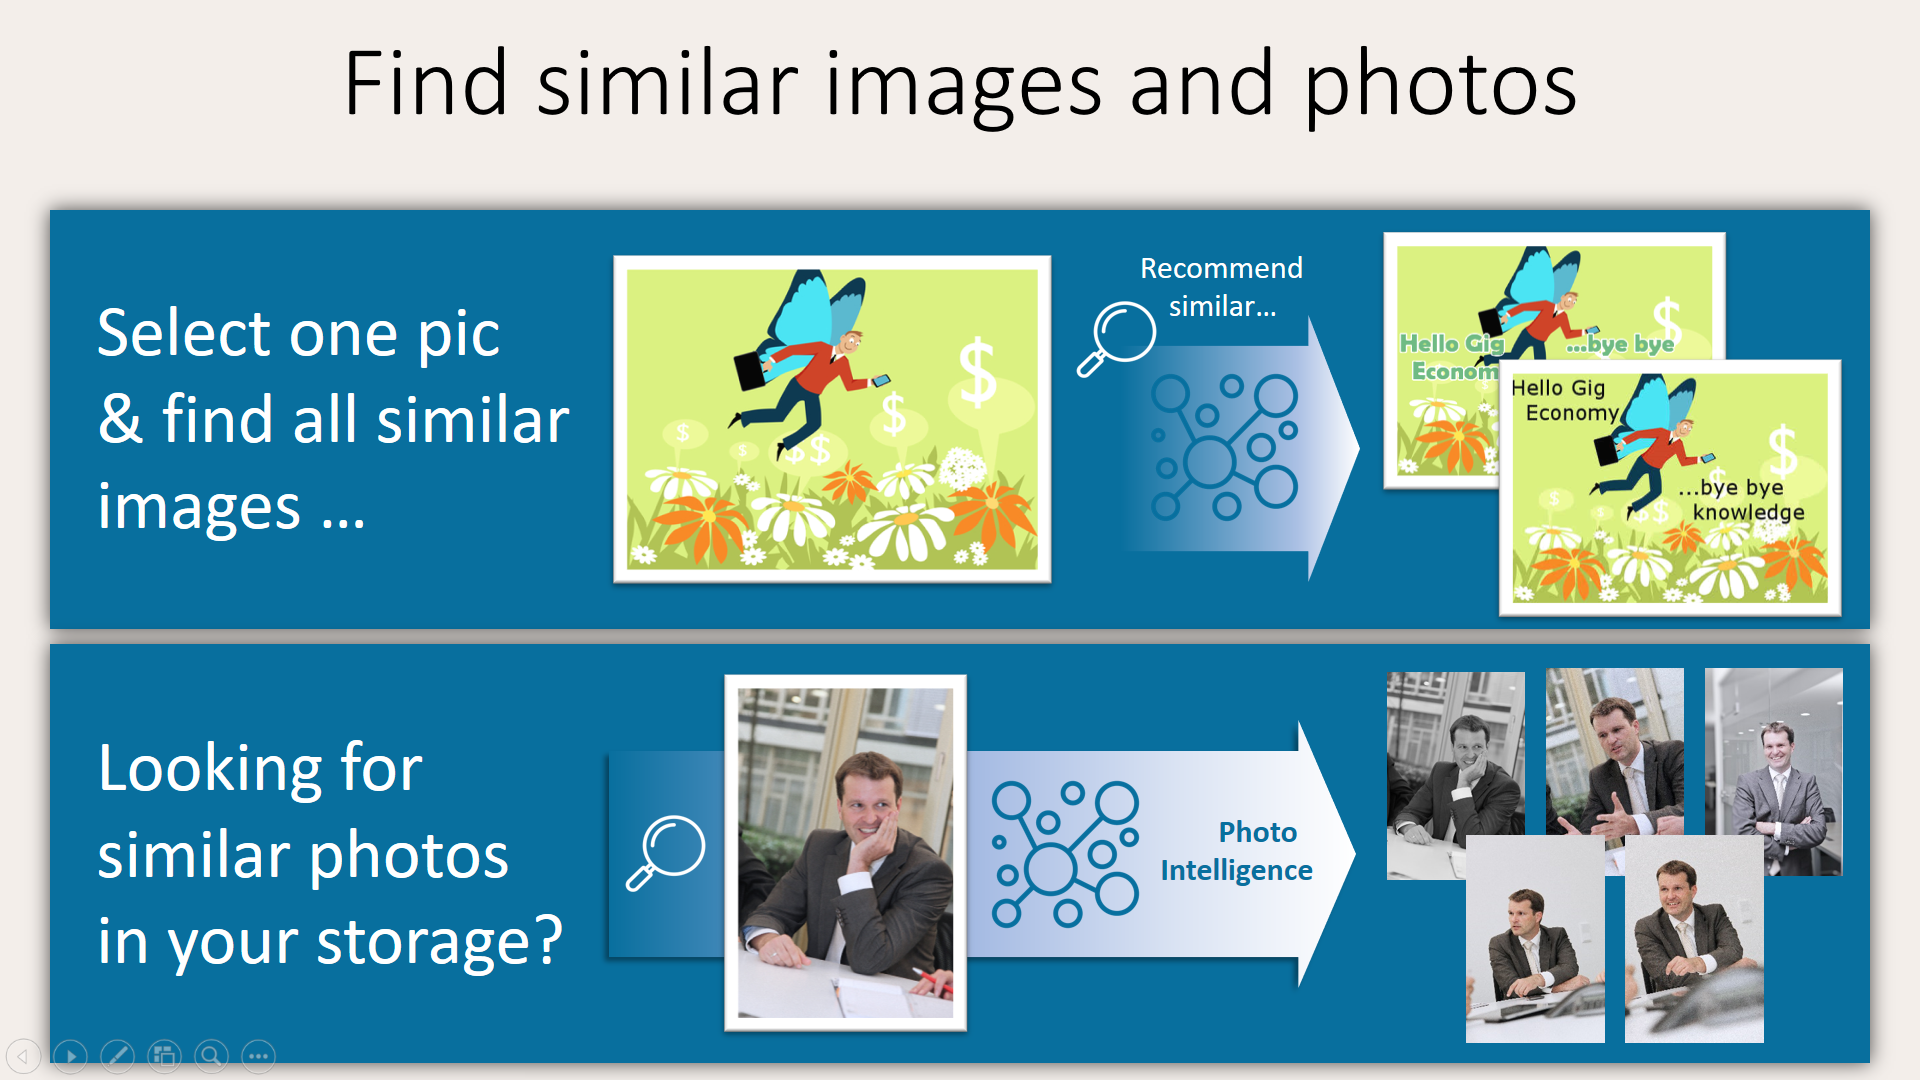
Our photo and image search features align with our efforts to use computer vision for knowledge retrieval. Users are able to find similar images via our integrated recommender engine with the blink of an eye. Only select one image shown in the results section and Noggle will automatically pull up all related and similar images in near-real-time.
Making your own photo and image library searchable with Noggle is now as easy as pulling up images on public search engines.
Image search options
You can search similar or related images like this:
Image search via external image drag and drop
Simply drag’n drop an image (.jpg/.png) file from your file explorer or email inbox onto the Noggle app search bar. The Noggle app will look for similar photos and images. The results will show up in the Noggle search results.
Image search via file explorer context menu
Use the windows file explorer context menu for image and photo search. The context menu opens with a right mouse click on the image. Select “Open with…” and choose “Desktop & Cloud search” from the selection to activate Noggle similarity photo intelligence. The Noggle app will open and show similar and related images.
Image search via Noggle client Do a text search within the Noggle client application: Just enter your search term and Noggle will check if there are images related to that search term. Once an image was found and shown in the search results, related similar images will automatically be shown in the “Related” info section of the search window.
Safe and secure
Image indexing is applied and stored locally on your client.
https://www.noggle.online/wp-content/uploads/2018/01/similarPics.png10801920LvThttps://www.noggle.online/wp-content/uploads/2015/12/noggle_l4_trans_black_goo.pngLvT2018-01-31 09:31:022018-03-31 12:32:31Image Search – Find Similar Photos and Images with Noggle Photo Intelligence
Some features require an active Noggle Insights account.
Valide your settings or upgrade your account via the Noggle Client Application in the settings panel and account section.
Upgrade your account after free trial period to ensure continuity for all cognitive insight feature
You can upgrade your account anytime to ensure continuity for our cognitive insight features by ordering the Windows 10 store in-app purchase for our “Noggle Insights Package” by using the button “Upgrade Account” in the Settings / Account tab section. You will be forwarded to the Windows 10 store to get the insights package.
https://www.noggle.online/wp-content/uploads/2015/12/noggle_l4_trans_black_goo.png00LvThttps://www.noggle.online/wp-content/uploads/2015/12/noggle_l4_trans_black_goo.pngLvT2018-01-29 12:51:032018-05-04 23:08:07Ensure active and valid account for insight features
The “Location” tab shows folder based treemaps for space-constrained visualization of relevant file hierarchies
The size of the cluster shows the relative count of files in that folder based on the search term. The color indicates the relevance of the found documents according to the search term specified. A clicked or selected cluster on the map will filter the overall search results list automatically.
https://www.noggle.online/wp-content/uploads/2015/12/noggle_l4_trans_black_goo.png00LvThttps://www.noggle.online/wp-content/uploads/2015/12/noggle_l4_trans_black_goo.pngLvT2017-11-26 12:31:192018-01-31 11:42:36Location Tree Map Clustering
We may request cookies to be set on your device. We use cookies to let us know when you visit our websites, how you interact with us, to enrich your user experience, and to customize your relationship with our website.
Click on the different category headings to find out more. You can also change some of your preferences. Note that blocking some types of cookies may impact your experience on our websites and the services we are able to offer.
Essential Website Cookies
These cookies are strictly necessary to provide you with services available through our website and to use some of its features.
Because these cookies are strictly necessary to deliver the website, refuseing them will have impact how our site functions. You always can block or delete cookies by changing your browser settings and force blocking all cookies on this website. But this will always prompt you to accept/refuse cookies when revisiting our site.
We fully respect if you want to refuse cookies but to avoid asking you again and again kindly allow us to store a cookie for that. You are free to opt out any time or opt in for other cookies to get a better experience. If you refuse cookies we will remove all set cookies in our domain.
We provide you with a list of stored cookies on your computer in our domain so you can check what we stored. Due to security reasons we are not able to show or modify cookies from other domains. You can check these in your browser security settings.
Google Analytics Cookies
These cookies collect information that is used either in aggregate form to help us understand how our website is being used or how effective our marketing campaigns are, or to help us customize our website and application for you in order to enhance your experience.
If you do not want that we track your visit to our site you can disable tracking in your browser here:
Other external services
We also use different external services like Google Webfonts, Google Maps, and external Video providers. Since these providers may collect personal data like your IP address we allow you to block them here. Please be aware that this might heavily reduce the functionality and appearance of our site. Changes will take effect once you reload the page.
Google Webfont Settings:
Google Map Settings:
Google reCaptcha Settings:
Vimeo and Youtube video embeds:
Other cookies
The following cookies are also needed - You can choose if you want to allow them:
Privacy Policy
You can read about our cookies and privacy settings in detail on our Privacy Policy Page.