OneDrive Business Search: How to connect different accounts

You can now create libraries of different OneDrive business accounts for the same provider (e.g. Microsoft OneDrive, Teams). A possible usage scenario is, for example, if you have several OneDrive Business Accounts and would like to integrate them into Noggle to ensure a uniform OneDrive Business search. Or if you work in several Microsoft teams with different accounts.

Here is how to connect with different accounts:

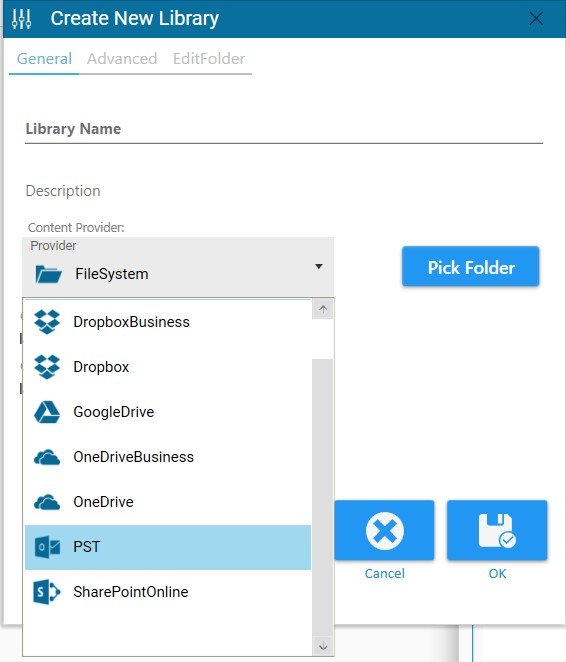
1. Open the Libray Manager panel

Library Manager

2. Create a new library via + button in the library manager panel

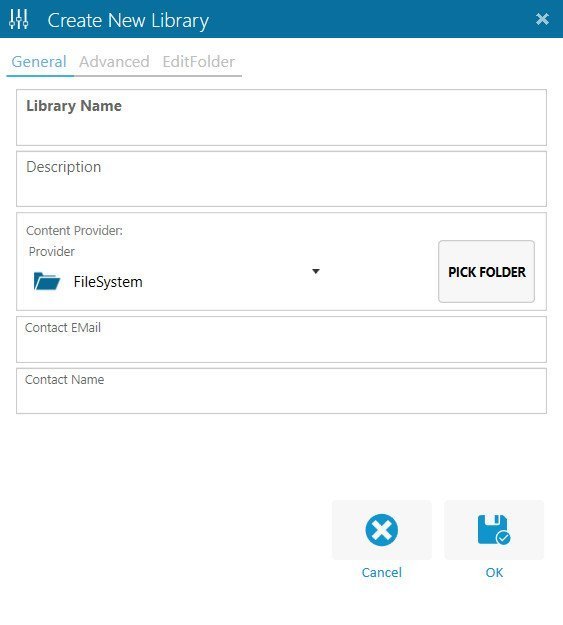
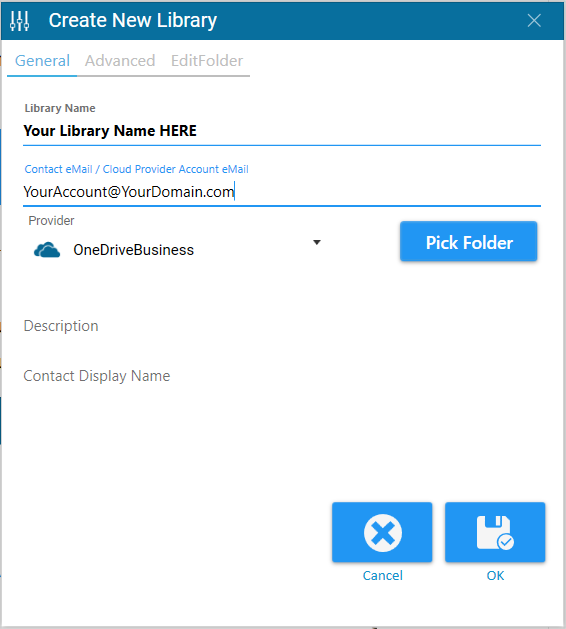
3. Name the library, add your account email and select provide

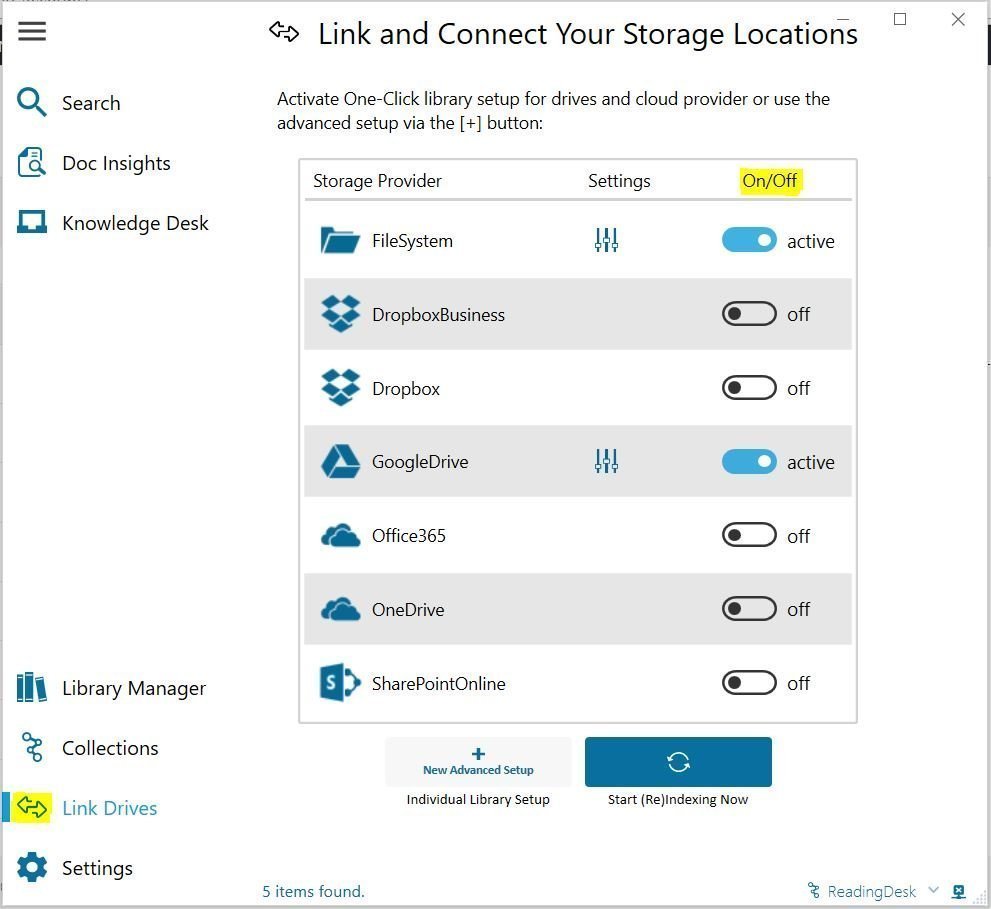
Please add your individual name. You can name choose your account eMail your want to link this connector to. Select the required connector in the “Provider” dropdown:

OneDrive Business Search settings for different providers

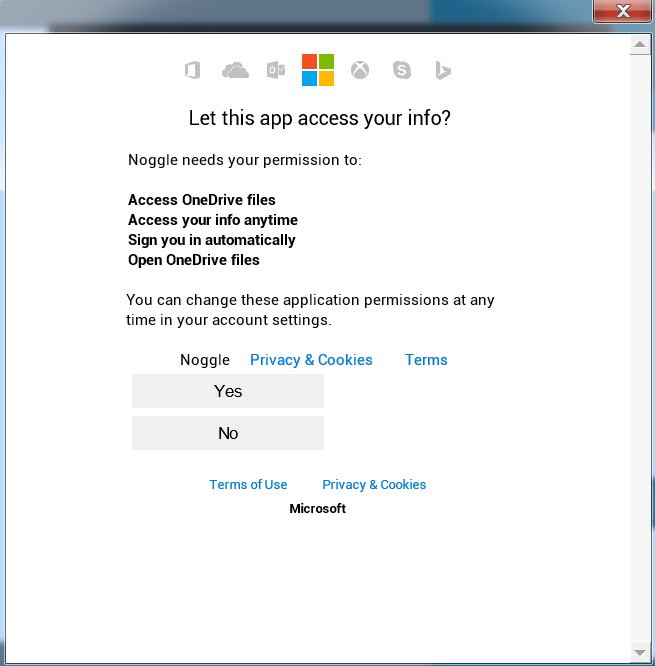
4. Click “Pick Folder” to start connecting to your account

If you click the pick folder button, Noggle will try to connect to the selected provider. The individual authorization dialog will start. The connection and authentication will be saved and synced with the given eMail from step 3. The authorization will be saved and kept once you did the authorization flow with you provider.

Once you finished the authentication flow, the folder selection panel will open. Please select one or more folders that should be indexed to ensure OneDrive business search in this library.

5. Click OK to start indexing

Follow Up Reading:

Office365 Integration

Microsoft OneDrive for Business

Search Outlook pst data files to find messages and attachments

Often, content, documents and knowledge is stored or archived in your eMail inbox including attachments. PST and OST are the Outlook data files acting as database to organize your eMail content. Individual PST or OST files hold your history of eMails and attachment. A search in outlook pst data files could be a great benefit to quickly browse your mail archives.

The good point is, that Noggle can completly index and integrate your PST outlook files into the Noggle search application. Noggle indexes eMail content including a full text and/or OCR scan of all attachments. This allows you to retrieve all emails and documents right from your Noggle search application.

Just add a new library with the PST source selection.

  1. Open the library manager rom the left main menu panel.
  2. Select the “+” button to create a new library on the right library manager panel.
  3. Name your new library, e.g. eMail Archive
  4. Select PST as content provider from the dropdown (see image below)
  5. Choose your .pst or .ost file from the file picker dialog
  6. Click “Pick Folder” to select the mailbox folder to get indexed
  7. Click “OK” to start the indexing routine
Create a new library with PST as content provider

You can also diretly open found eMails or attachments from within the Noggle client. No need to import your PST file into Outlook – simply use Noggle to search and retrieve important knowledge out of your existing PST files.

One license for desktop, laptop, tablet, and work computer

You can use the Noggle PRO application on as many computer as you like with just one single PRO license. As long as you use the same user account name on each computer.

Once you registered your PRO license from the first computer, you will receive an email with your individual, personal application key. You can re-use this application key to enable your PRO license on other devices too.

Just download and install the free basic Noggle Windows 10 application via the Microsoft store on each computer. Finally, add your user account email and application key in the settings panel. Now, you can use your PRO license on all devices.

How to order or upgrade your account

You can upgrade your Noggle application to a full version via the “In-App” purchase option. Start the application on your local desktop and open the “Settings” section via the button in the lower left corner of the application.  In the “Account” tab, use the available button to upgrade/buy a license.

You will be directed to the Microsoft Store In-App purchase dialog to complete your purchase.

CLICK HERE TO START IN-APP UPGRADE 

Press Release: Noggle app launches in Windows Store, for download in 242 countries worldwide

Noggle is proud to announce that it has worked closely with Microsoft engineers to pass its commercial and technical certification process – as a result, the Noggle app is now officially available for the Windows10 eco system. The app is listed in the Windows Store, offered for download to all 242 markets served by the store worldwide.
The app can be downloaded at the following location:
https://www.microsoft.com/en-us/store/p/noggle-knowledge-assistant/9nblggh6cp8k

The Noggle Knowledge Assistant app is free to download for PC.

“Being officially recognised by Windows is a big step forward for the Noggle brand. We hope that being available to download from the Windows Store will stamp our authority as a trusted and robust application, and make our document management software more accessible to a new audience of knowledge workers looking for a better way to organise and connect their content.”, Lars Von Thienen, CEO.

Introducing the Knowledge Bot for version 3.0.8

To coincide with its Windows10 debut, Noggle is marking this important step in its progress with further developments to the system, in the form of the Knowledge Bot. Running as a parallel feature to the application, the bot can talk to the user via email, Skype and telegram, and is now available in version 3.0.8.

Features of the Noggle Knowledge Assistant app:

  • Unified document search across different storage locations (Computer, Network, Dropbox, OneDrive, Google Drive, SharePoint, etc.)
  • Visual AI-guided search results and document clustering
  • Integrated document discovery from external science libraries and journals (Patent database, TED Talks, Springer Journals, IEEE and more)
  • Similarity search and instant document recommendations
  • Secure document and knowledge sharing for teams
  • “Personal Knowledge Assistant” Bot


Can Noggle integrate external or individual data-sources?

Integrate individual and external data-sources with our pre-defined API connector

The Noggle client is built on an open and extensible framework and enables you to integrate different data sources. We provide two API definitions that allow you to integrate your individual datasets or existing search applications into the Noggle client:

Library Connector API

This API allows you to create different connectors to individual data sources. You code the access and data gathering procedures for your own data source (e.g., an internal SQL database or JIRA application) and feed that content into a Noggle Library via the Noggle Library Connector API. The library connector will be distributed on each client. Each client will then be able to use this connector to connect to your internal data sources and use all Noggle functions to index, search, retrieve, cluster, and so on. Our own public connectors (e.g., GoogleDrive, OneDrive, SharepointOnline) are built into this API. We provide basic source templates so you can get started quickly.

Managed Library API

This API allows you to connect to central hosted search APIs via the Noggle network. So, if you have an internal application with existing indexing and search capabilities, you can connect directly to that application via our managed library API. This means that you don’t need Noggle to build your local index libraries. You can use the existing search application and integrate the features directly into the Noggle client as a managed library. The user experience interface then allows the user to use existing search features from the Noggle front end without switching to different search engines or apps.

Both APIs require an enterprise subscription. With that, there are no limits to integrating whatever datasets you want into the cognitive retrieval features of Noggle.

How To Create A New Digital Library

Option A: You can use the Library Wizard to connect additional storage locations with “one-click” setup.

Click on the “Link Drives” icon in the menu panel and activate additional storage locations with the on/off button for each location.

add storage locations

Option B: Setup individual libraries with individual folder selection, different file type specification, and parameter configuration with the Library Manager.

Open the “Library Manager” from the menu panel. The “NEW” library button in upper right corner of the “Libraries” panel opens a new dialog to build an individual document library.


New Library Button

New Library Button


A new window opens to set all parameters for the new library.

Create Library

Create New Library Screen


Now, just add the requested information to setup the library:

  1. Add a name to your library
    The name is shown in the library panel.
  2. Give it a short description
    The description is a short information about the content for the library.
  3. Select the provider you want to use
    You can choose between your local file system, network drives and cloud providers like OneDrive, OneDrive Business, Dropbox, Dropbox Business, Office365 Sharepoint Online or Google drive.
  4. Select the folders for indexing via the pick folder button
    Now, the pick folder screen allows to select the folders which should be included for the library. Finally, press “OK” once you have selected all folders. In addition, you can add/update and change the folder selection later at anytime.

    Select Folder Dialog

    Select Folder Screen

  5. Add or change the contact EMail
    Furthermore, if you decide to share your library with other colleagues later, the email information is important for your collabortors. Therefore, if a collabortor finds a documents within your library, the email can be used to request access to that document.
  6. Add or change your short name
  7. Click “OK”
    Finally, a dialog will open to allow direct indexing start.

Search OneDrive Documents – Office365 Integration

Search OneDrive Documents – How to integrate Office365 with Noggle

Noggle has direct interfaces to quickly find and search OneDrive documents via Office365 API integration.

Adoption of SharePoint Online, Office365 and OneDrive is high. Some companies have standardized on Office365 with OneDrive for Business as an document management platform while others use different storage locations for sharing files. In either situation, the reality is that business workers store information in multiple places — SharePoint, network file shares and cloud storages. To find that information is often a frustrating task of switching from application to application.

Noggle for Microsoft Office 365 enable information workers to easily and efficiently search, find and access documents from one single unified front-end desktop application. Noggle integrates OneDrive, OneDrive for Business and Office365 SharePoint Online storage locations to build and share knowledge libraries.


Noggle has registered apps to integrate with Microsoft OneDrive and OneDrive for Business storage accounts. Choose “OneDrive” or “OneDriveBusiness” as provider when creating a new noggle library. During library initialization, you must authorize the Noggle app to get access to your OneDrive account. The authorization flow will start automatically and only needs to be processed once.

OneDrive Authorization Flow

Login with your OneDrive Microsoft account data and approve the Noggle application permission request.

OneDrive Personal

OneDrive for Business Authorization Flow

1. Login with your Office365 account to authorize the noggle application:

Search OneDrive Documents - Noggle Login

2. Confirm that Noggle is allowed to read your OneDrive files:

Search OneDrive Documents - Noggle Login Confirmation

This procedure is only needed once for initial account authorization. You can revoke OneDrive storage access for Noggle at anytime via your Office365 portal.

How to revoke access:

If you want to revoke access, login to your Office365 account, navigate to “My App permission”. Follow this article for detailed instructions

Revoking Consent for Noggle Knowledge App in Azure Active Directory